


Oasis Farm Report January-2024


Happy New Year Tribe,
Can you believe we’ve made it to 2024?
We barely can believe it ourselves. This past year was nothing short of the climax scene from Twister. You know the one where the Big Whopper Tornado is right over them and they strap themselves to pipe. Yeah, that’s a good way to describe our 2023.
We have survived and for that we are grateful. We didn’t just survive though…we are starting this new year with a renewed focus towards our goals. The roadblocks and curve balls of 2023 have shown us (and are still showing us) more options and better ways. It’s funny how the crisis of the moment often doesn’t reveal its lessons until much later.
We always hope we are open to it (the lesson).
I’m sure we have more revelations ahead and I’m thankful. I believe that as we learn a life lesson we no longer receive the challenges meant to reveal that lesson. Live it, Learn it, Move on! (to the next challenge/lesson)…such is the growth of life.
Learning to love ourselves is truly the most challenging of lessons and one I am still learning through daily challenges. This last year has shown me that the more I love and take care of myself the less those other challenges affect me.
If you follow our Rabbit Hole Randomness blog you will have received my latest post Thanks & Namaste explaining a bit of what our crazy Twister life has been of late, and where were are headed (Remember that mention of renewed focus on our goals).
Looking back over the year I see survival in its simplest forms, day-to-day, sometimes even minute-to-minute, and yet we are here, at that point of stagnation where it seems that no forward movement is happening, no steps are being taken.

Great big challenges (like eating an elephant) need to be broken down into bite-size pieces. Our elephant/challenge is daunting and we are REALLY tired of the taste of elephant, but we know that the only way out is through.
Soon there will be nothing left of our elephant and one day we will look back on having had to eat this elephant and laugh, but at this moment I don’t even want to think about eating elephant ever again.
Oh, wait! We’re having elephant for dinner again! UGH….hahaha
Side Note:
If you’re having a tough time figuring out how to answer that dreaded question (moms know this one), many days below celebrate some type of food or ingredient (noted by bold & italics). Pick a couple that inspire you and use them to help plan your meal.
Let the calendar answer that dreaded question for you.
Happy 2024! We love you and are so grateful for the support we receive. Y’ALL ROCK!
January Fun 411:
Flower: Carnation, Snowdrop
Birthstone: Garnet (Constancy)
1-1
First Footing
National Hangover Day
New Year’s Day
1-2
International Stop Spam Day
1-3
Festival of Sleep Day
1-4
National Spaghetti Day
Trivia Day
1-6
Bean Day
Cuddle Up Day (be cautious of the order you celebrate these)
1-7
Old Rock Day
1-8
Bubble Bath Day

Image Courtesy of melonheazillustrating.net

1-9
Play Good Day
1-10
Bittersweet Chocolate Day
Houseplant Appreciation
National Take the Stairs
1-11
NEW MOON
Step in a Puddle and Splash Your Friends Day
Learn Your Name in Morse Code Day
1-12
National Hot Tea Day
1-13
Friday The 13th
Make Your Dreams Come True Day
National Rubber Duckie Day

Image Courtesy of https://www.pinterest.com/pin/302093087481422651/

1-14
Dress up Your Pet Day
1-15
MLK Jr. Day
National Bagel Day
National Hat Day
1-16
Appreciate a Dragon Day (One of my personal favorites)

image courtesy of pngtree.com

1-17
Kid Inventors Day
Hot Buttered Rum Day (see recipe below)
1-18
Winnie the Pooh Day
Thesaurus Day
1-19
National Popcorn Day

Image Courtesy of clkr.com

(We love popcorn! We order ours from azurestandard.com, click on the link to find a drop in your area, or start one of your own. That’s what we did!
Our favorite popcorns are their Organic Multicolored Popcorn and Organic Mushroom Popcorn.)
1-20
National Buttercrunch Day
National Cheese Lover Day
Penguin Awareness Day
1-21
National Hugging Day
Squirrel Appreciation Day
1-22
Chinese New Year (Gung Hay Fat Choy)

Image Courtesy of pngtree.com National Blonde Brownie Day

1-23
National Pie Day
1-24
Beer Can Appreciation Day
Compliment Day
Global Belly Laugh Day
1-25
FULL WOLF MOON

Image courtesy of almanac.com Opposite Day

1-27
National Seed Swap Day
Chocolate Cake Day
1-28
National Kazoo Day
1-29
National Puzzle Day
National Corn Chip Day
Bubble Wrap Appreciation Day
1-30
National Inane Answering Machine Day
1-31
Inspire Your Heart With Art Day
Backward Day
For the Month:
National Blood Donor
National Hobby Month
Hot Tea Month
National Oatmeal Month
National Soup Month
Happy New Year from the Oasis
La Vita e’ Bella, M.o.M. (Mistress of the Manor)
Oasis Farm Population +/- 78
Caretakers: 3
Cats: 4
Chickens: +/- 47
Cows Beef: 0
Cows Dairy: 0
Dogs: 3
Goats: 2
Pigs: 0
Rabbits +/- 8
Sheep: 8
Turkeys: 3

Livestock Trailer
EGG fridge - old but still in good working order
Hay &/or Grain Feeders
Fencing
There are so many items needed on diversified farms such as ours.
Building a relationship with your local farmer is one more way to know more about your food while helping to keep small farms like ours viable.
It will be a win-win!

Eggs $5/dozen Veterans $4/dozen Message for availability and pick up
-Currently NO deliveries -Pick-Up days by pre-arrangement

Let It Snow
Make Unique Snowflakes Just Like Mother Nature
January is winter, and nothing says winter more than snow.
What if you don’t get snow where you live?
Let’s bring the snow inside! Wait, what? Mom says no snow in the house!
These snowflakes won’t melt and will bring a bit of fun and creativity to those winter doldrums and cabin fever.
Creating snowflakes takes very little in the way of tools and materials. Paper, pencil, and scissors and you are on your way to a winter wonderland. A bit of string and tape to allow hanging your snowflakes. Pretty simple, right?
Paper can take all forms: printer paper, colored papers, newsprint, magazine pages, and even coffee filters can be used to make snowflakes.
The pencil is used to draw your snowflake design on your folded paper, the scissors to cut out your design, and string and tape to hang them.
So, go grab your supplies, and let’s make a snow flurry!
Below are patterns and simple instructions from One Little Project.com
Instructions
Take a square piece of paper and fold it in half diagonally to make a triangle.
Fold the triangle in half again to make a smaller triangle.
Fold this smaller triangle into thirds. Start by bringing the right point towards the left by one-third.
Then bring the left point towards the right by one-third. You might have to adjust the folds to make sure the edges line up perfectly.
Cut off the pointed ends so you’re left with a small triangle.
Cut your snowflake pattern into the sides of this small triangle.
Unfold your snowflake carefully and use your fingers to flatten it out.
These are the patterns she shares. Aren’t they fun!
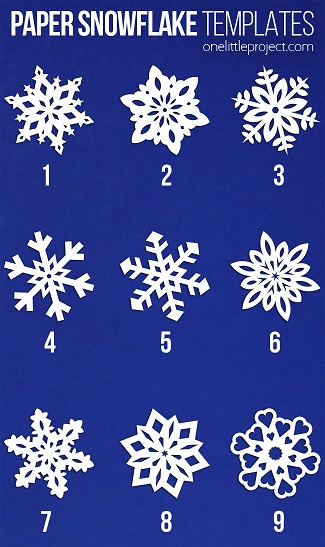
You can find all the templates plus a blank template so you can create your own at onelittleproject.com/how-to-make-paper-snowflakes/ (these amazing templates show exactly where and how to fold the paper and where to draw the pattern for cutting)
Remember how I mentioned coffee filters could be used? One Little Project.com has a wonderful article showing how to make these beauties…

https://onelittleproject.com/coffee-filter-snowflakes/
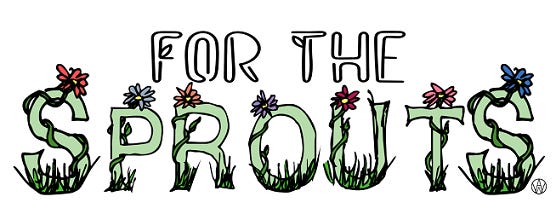
This site has so many wonderful ideas for the Sprouts. I encourage you to take a stroll through all she has to offer. After that, cabin fever should be a little easier to deal with.
Another site to find some great snowflake patterns is firstpalette.com

Last year at that time I wrote about it being the season for “soups, stews, chowders, and chilis”, and while this is still true, do I want to share more of these recipes?
This is after all a brand new year so I could do something brand new.
How about drinks? Yes, that’s the ticket!
Warm/Warming drinks that help stave off the cold of winter in January.
Let’s start with a classic…

Mount Vernon Eggnog
Recipe Found at: almanac.com
Ingredients:
12 eggs (pasteurized if possible), room temperature
1/2 cup sugar
One-fifth bourbon (750ml bottle)*
1/2 teaspoon salt
1-quart whipping cream
Optional: 1 cup milk
1 to 2 teaspoons nutmeg, freshly grated (not ground)
*Note: You can adjust the amount of alcohol in this recipe or omit it altogether. Or, use a different alcohol on hand; common choices include brandy, rum, bourbon, or whisky. One eggnog recipe we enjoy (from the 1950s) uses “1 cup bourbon and 1 cup Cognac” instead of the one-fifth bourbon.
Directions:
Separate the egg whites and yolks very carefully, ensuring there is no yolk in the whites. Cover the egg whites and store them in the refrigerator.
Whisk egg yolks and sugar in a large bowl. (Or, use an electric or stand mixture with a whisk attachment.) Whip until thick and smooth; it should be lemon yellow in color in 5 to 7 minutes.
Slowly add the desired alcohol to a large bowl while beating at a slow speed. Scrape down the side of the bowl. Chill mixture for several hours or overnight.
In a separate bowl, beat the egg whites and salt until almost stiff.
Whip the cream until stiff.
Fold the whipped cream into the yolk mixture, then fold in the beaten egg whites. Chill for one hour.
When ready to serve, sprinkle the top with freshly grated nutmeg. Serve in punch cups with a spoon.
Add 1 cup of milk to the yolk mixture for a thinner eggnog if desired.
Next, Let’s Make…

Hot Buttered Rum
Recipe found at wineenthusiast.com
I found many great recipes, many using ice cream in the mix, but this one reminds me of the recipe my family would make, so this is the one. The other I would choose is on punchfork.com. Click on the link to be taken to the site.
Ingredients
1 stick (4 ounces) unsalted butter
½ cup light brown sugar
1 teaspoon vanilla extract
1 teaspoon ground cinnamon
1 teaspoon ground cloves
1 teaspoon ground nutmeg
1 teaspoon ground allspice
Pinch of salt
2 ounces dark or aged rum
6 ounces hot water
Cinnamon stick, for garnish (optional)
Directions
In mixing bowl, combine butter, vanilla extract, sugar, spices and salt. Beat until well combined.
In heat-proof glass or mug, combine aged rum with 1 ounce (2 tablespoons) spiced butter mixture. Remaining batter can be stored in airtight container in refrigerator for future use.
Top with hot water and stir until ingredients are well incorporated. Garnish with cinnamon stick if preferred.
(Note: For a non-alcoholic version omit the Rum. Can use apple cider in place of the water)
Cheers to you as you start this brand new year with a nice drink in hand, to warm you through on these cold winter days.

Simple Sourdough Options (using discard)
Back in April and May of 2023, I shared recipes that used sourdough discard. In the April Oasis Farm Report, it was Sourdough Pigs in Blankets from PantryMama.com, and in the May report, it was Sourdough Pineapple Upside Down Cake from makeitdough.com.
I hope you have had the opportunity to try at least one of those amazing recipes. This month will be more recipes using Sourdough Starter. (Technically the part being used is called Sourdough Discard. It’s still a sourdough starter but the portion you pull off when you feed your main starter).
My discarded sourdough (stored in the fridge) was beginning to look like quite a bit. I call it my Discard Dorm and it was quite full. Time to be a bit creative in the kitchen.
One night I made Corn Chowder (my dad’s recipe) and Skillet Sourdough Discard Cornbread from lynnswayoflife.com.
Then we made Sourdough Snickerdoodle Cookies from pantrymama.com, so yummy.
Finally, we had the Sourdough Skillet Dinner from MarysNest.com. This was such a hit that I made the savory variation twice and then a sweet variation. I will share my creations below.

Note: Any changes I made are noted in (italics). I used what I have on hand so I’ll let you know if I made the necessary changes.
Skillet Sourdough Discard Cornbread
Recipe from: lynnswayoflife.com
Ingredients
1 cup Cornmeal (Used Organic White Corn Masa from azurestandard.com)
1 ¼ cup All Purpose Flour (We grind our own. I used 1/2 cup rye flour & 3/4 cup soft white wheat flour)
2 teaspoon Baking Powder
½ teaspoon Baking Soda
1 teaspoon Salt
½ cup Butter Melted
½ cup Sugar
1 cup Buttermilk (Used half & half)
1 cup Sourdough Discard Inactive
2 Eggs
Instructions
Preheat the oven to 375 degrees. Place a cast iron skillet in the oven to preheat it.
In a medium bowl, add the flour, cornmeal, salt, baking soda, and baking powder. Mix to combine and set that aside.
In a large mixing bowl, add the sugar and eggs. Add the sourdough starter, buttermilk, and butter. Mix well to combine.
Add the dry ingredients to the wet ingredients and mix until just combined. The batter will not be smooth, it’s ok if there are a few lumps left.
Carefully take the cast iron skillet out of the oven and add 1 tablespoon of butter. Let the butter melt and coat the bottom and sides of the skillet. Pour the batter into the skillet and place it in the oven.
Bake for 30 minutes or until a toothpick is inserted and it comes out clean.
Allow the cornbread to come to room temperature before cutting into it.

Sourdough Snickerdoodle Cookies Recipe
from PantryMama.com (One of my favorite sites.)
She uses weights for her measurements so I will give you the conversions I came up with, remember though my flour result will be different than what you would get due to the flour I use. The remaining ingredients should be the same.
INGREDIENTS
250 g Sugar fine (Used plain white sugar. 1 1/8 cups)
230 g Butter room temp/soft (2 sticks=1cup)
1 Egg
100 g Sourdough Starter or Sourdough Discard (@ 1/2 cup)
2 tsp Vanilla extract
400 g All Purpose Flour (Used a mix of fresh ground Rye & Soft White Wheat Flour. 3 1/2 cups plus @1 tablespoon)
12 g Cream of Tartar (2 tsp)
10 g Baking Soda (1 tsp)
5 g Salt (½ tsp)
3 g Cinnamon (2 tsp)
Topping
80 g Sugar Fine
1 g Cinnamon (1 tsp)
(I keep cinnamon sugar mixed and ready in my cupboard so I can’t provide a weight for the sugar)
INSTRUCTIONS
I make my sourdough snickerdoodle cookies in a stand mixer, however you can use hand beaters, a Thermomix or just do it by hand (just use a whisk and elbow grease). (I chose to use my KitchenAid stand mixer, and I’m super glad I did)
Start by creaming together butter and sugar (I do this in a stand mixer). The butter and sugar should be pale and creamy.
Now add the egg, sourdough starter and vanilla and beat until well combined. Set this aside for the moment.
To a separate bowl, add the flour, salt, cinnamon, baking soda & cream of tartar. Mix thoroughly until well combined.
Add the creamed wet ingredients to the dry ingredients. Add it in 2 or 3 parts so it's easier to mix through.
You should end up with a thick biscuit dough. Don't worry if it feels too soft. But it should be thick.
I find this bit really easy with a stand mixer - but if you are doing it by hand, just go steady and add the dry ingredients bit by bit and the dough will come together.
Cover the snickerdoodle dough and refrigerate for at least an hour (you can leave the dough in the fridge for up to 3 days with no issues).
When you're ready to bake them, preheat your oven to 375F (190C).
Mix the sugar and cinnamon for the topping together in a small bowl.
Line 2 cookie sheets with parchment paper. Roll the snickerdoodle dough into small ball (around 1 tablespoon dough). Roll each ball into the bowl of cinnamon sugar and place onto the cookie sheets allowing plenty of space around them.
Use the back of a spoon to create an indent in each ball of dough. (I used my thumb)
Bake the sourdough snickerdoodles for 10 minutes at 375F (190C). They will be soft and slightly under baked when you take them out.
Allow them to rest on the tray for 10 minutes before removing and placing on a wire rack to fully cool.

Sourdough Skillet Dinner
from MarysNest.com (One of my other favorite sites!)
Ingredients
Skillet Mixture
2 tbsp. Butter, salted or unsalted Any other fat can be substituted, including ghee, olive oil, coconut oil, tallow, or lard. (Used lard we rendered)
1 large Onion, any color, diced
3 cups Chopped veggies, fresh or canned
1 tsp Salt Reduce to 1/2 teaspoon if using salted butter.
1/2 tsp Ground black pepper
1/4 tsp Crushed red pepper flakes, optional
2 cups Chopped chicken Another cooked meat can be substituted. Alternatively, a non-meat options, such as beans, lentils, and the like, may be substituted. (Used ground beef and cooked it with the vegetables and seasonings)
Skillet Topping
1 tsp Herb seasoning Any will do, such as Italian seasoning or Herbs do Provence. (for the first I used Carne Asada seasoning, garlic, and extra pepper while the other was more akin to a beef pot pie)
2 tsp Baking powder
1 tsp Baking soda, optional This ingredient will help reduce the sour taste of the sourdough discard topping if you prefer a milder flavor.
1 tsp Salt
1 1/2 cups Sourdough starter (Discard)
3 tbsp. Melted butter, cooled
3 large Eggs
1 1/2 cups Cheese, grated Any melting cheese or mixture will do, such as Colby, Monterey, Cheddar, Swiss, Mozzarella, etc.
Instructions
Skillet Mixture
Preheat the oven to 400°F.
Add butter to a cast iron frying pan and allow to it melt on the stove on medium heat. Add onion and sauté for a few minutes until golden.
Add veggies to the pan along with salt, black pepper, and red pepper (if using). Sauté for a few minutes until vegetables are tender.
Add chopped chicken to the pan and mix well. Allow the chicken to warm through. Then remove the pan from the stovetop and transfer it to a foil-lined baking sheet. (See video.) The foil-lined baking sheet will help catch any bubble over if you have an active sourdough discard.
Skillet Topping
Prepare the skillet topping in a medium-sized bowl by mixing the seasoning, baking powder, salt, and baking soda (if using) together.
Add the sourdough starter to the bowl and mix well.
Add the melted butter to the bowl and mix well.
Add the eggs to the bowl and mix well.
Pour the Skillet Topping over the Skillet Mixture in the pan. Top with grated cheese and transfer to the preheated oven. (I found that after the first one I made overflowed my skillet in the oven, I baked the next two in casserole dishes which worked much better.)
Bake for approximately 25 minutes at 400°F until the topping is puffed and the cheese is melted and golden. Serve and enjoy!
Well-wrapped leftovers can be stored in the refrigerator and will stay fresh for 2-3 days. Well-wrapped leftovers may also be frozen and will stay fresh for 2 months.
To reheat leftovers, place on a baking sheet in a preheated 325°F oven for approximately 20 minutes until warmed through.
I mentioned above that I made three variations. The first was the Mexican flavor using Carne Asada seasonings. The Second I made was more akin to a beef pot pie flavor.
The third was dessert!
Yes, you read that right. I took that recipe for dinner and turned it into a dessert, Thanks to my partner wondering if the topping would work with fruit?
Challenge On!
I used a decent size bag of Organic Frozen Fruit, with 1/2 cup sugar, 2 tbsp. E-Z Gel and +/- 1/2 - 3/4 cup water, for the filling. Once this was heated through I put it in a casserole dish.
For the topping, I used cinnamon, fresh ground nutmeg, and ground cardamom.
Instead of cheese, I sprinkled a nice layer of cinnamon and sugar on the top before baking.
I baked per the instructions and BAM we have a new dessert on the menu.
I hope you will give these wonderful recipes a try. I would love to hear how you made them your own.
Community Partners

A huge THANK YOU to Salina at Artistic Wonders for the wonderful Graphic Art.
If you require art of any sort give her a shout at:
artisticwonderscreates@gmail.com

Quail eggs! Aren’t they gorgeous?
Still an obsession.
We received these from our wonderful community partner,
Cooper’s Homestead, and Crafts.
Yes, they sell them.
Regular $4/dozen
Hatching $5/dozen
Over 8 dozen $3/dozen.
If interested contact: Rachelle Cooper text: 530-782-8545